Physical Computing with JavaScript (1/8) — Let’s Get Started

This tutorial explains what is and how to implement physical computing for JavaScript developers without preliminary hardware knowledge. Anyone can easily handle various sensors and hardware through this tutorial.
Let’s get out of the traditional computers
When you think of programming, you usually think of receiving input with a keyboard or mouse, processing something with a computer, and then displaying it on the screen. Physical computing refers to interacting with physical objects outside of a computer. For example, reading a temperature sensor value, performing some processing, and then operating a servo motor or turning on an LED light bulb.
In the past, it was only possible to do this with expertise in electronics and embedded computing, but now non-professionals can create these things without difficulty. Representatively, Arduino, Raspberry Pi, and Micro:bit are widely known. When you get into physical computing, you can create your own table clock, thermometer, cooking timer, and even the Internet of Things (IoT) and wearable devices.

In the meantime, Arduino, which is mainly based on the C/C++ language, has become the mainstream in physical computing. Arduino is a great system and it’s very easy to get started, but in the end, you need to know the C++ language well, which makes it difficult for majors to work on projects that increase complexity.
Recently, platforms (MicroPython, CircuitPython, NodeMCU Lua) that can use easy-to-use scripting languages have emerged. Other languages are good, but if you are already familiar with JavaScript, or if you are new to programming languages, I recommend starting physical computing with JavaScript.
The reason is: first, JavaScript is one of the most popular languages. For reference, it has been ranked first in the programming language rankings released by RedMonk for several years. Second, it is suitable for event-driven programming. Most of the work is done in response to the occurrence of an event (e.g., a change in sensor value) and some processing (e.g., operating a motor). Most JavaScript execution environments directly support this programming model. Third, physical computing often requires interworking with other technologies. For example, if you need to collect sensor data from a web server, or if you want to view information remotely by creating a mobile app or web page, you don’t have to learn a new language.
Even desktop applications running on Windows or Mac, artificial intelligence applications, etc, it is a truly versatile language. Here is Kaluma, an open-source platform that can be used for physical computing.
Raspberry Pi Pico
To get start physical computing, you need a microcontroller board. In this tutorial, we will use Raspberry Pi Pico (Pico — hereinafter), which was recently announced by the Raspberry Pi Foundation. Not only does it perform well, but it is also gaining great popularity because it costs only $4.

Install Kaluma
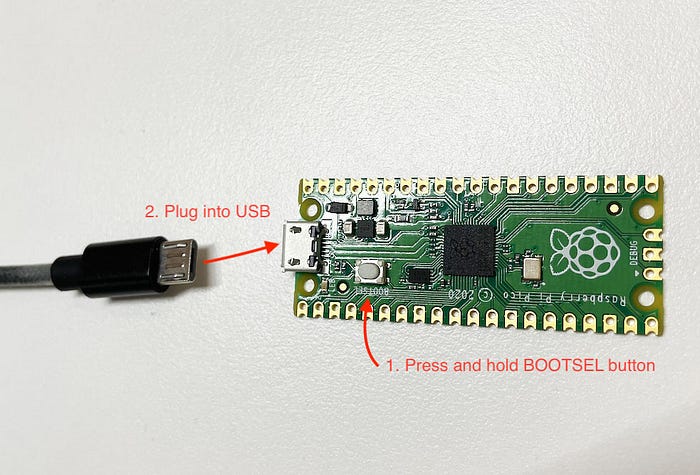
Now let’s install Kaluma on Pico. Kaluma is an open-source JavaScript runtime for microcontrollers. If you are familiar with Node.js, you can understand that Kaluma is a very small Node.js. After accessing the Kaluma website below, go to the Download page and click the Download .UF2 button to download the .UF2 file. It is too easy to upload the downloaded.UF2 file to Pico. First, connect my PC with USB by “pressing” the BOOLSEL button of Pico shown in the picture below. Then, it is recognized as a USB storage device in the PC. Then, copy and paste (or drag and drop) the downloaded. UF2 file to it to complete the installation.
Install CLI (Command-Line Interface)
In order to program Pico with Kaluma runtime, Kaluma CLI must first be installed. Of course, it is assumed that Node.js is installed here.
$ npm install -g @kaluma/cliAfter the installation is complete, check the CLI help as shown below.
$ kaluma helpIf the Pico is normally connected to my computer via USB, check the serial port as shown below. You can check the serial port name to which my Pico is connected.
$ kaluma portsConnecting with Terminal
Now, you can connect the Pico with a serial terminal program and use it in REPL (Read-Eval-Print Loop) mode. Here, we will try to connect to Pico using the screen command provided by default in macOS and Linux (in case of Windows, you must use a serial terminal program such as PuTTY). Connection is established by passing the name of the serial port connected to the Pico and the baudrate to the screen command as arguments.
# for MacOS
$ screen /dev/tty.usbmodem.. 115200# or for Linux
$ sudo screen /dev/ttyACM.. 115200
If the screen doesn’t appear at first, just hit Enter a few times and a prompt (>) will appear. If you enter the command .hi here, a welcome message will appear as shown below. In addition, a JavaScript expression can be executed at the prompt, and a REPL command can be executed. To check available REPL commands, type .help.
If you want to exit the screen terminal, press ctrl+a, k, y in succession.

Turn on the onboard LED!
Let’s check if the JavaScript program is working properly. There is one on-board LED attached to the Pico. Let’s turn it on with a simple code. First, move the cursor to the terminal and then enter the following two lines in order. The first line means to switch pin 25 (GPIO25) to output mode. Note that the onboard LED is directly connected to pin 25. The second line means outputting HIGH value to pin 25. In other words, it means to supply power to pin 25, so the LED lights up brightly. If you want to turn off the LED, you can enter digitalWrite(25, LOW).
> pinMode(25, OUTPUT);
> digitalWrite(25, HIGH);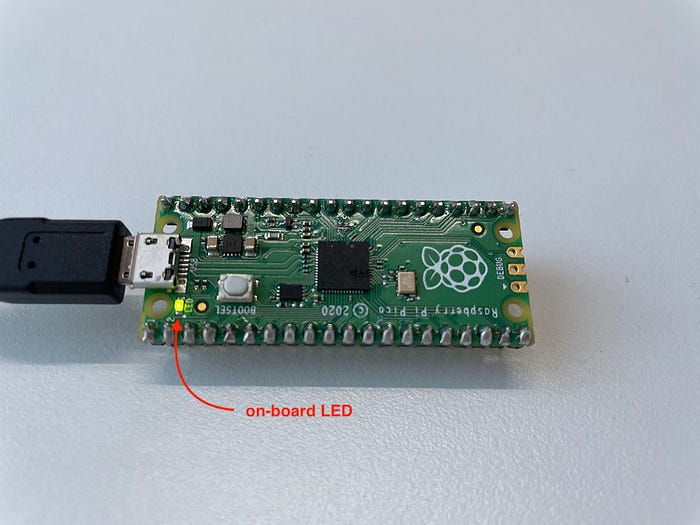
Well begun is half done
If you have followed well so far, you have now entered the world of physical computing. Well begun is half done. Now, if you learn one by one, a new world will open up with the confidence that you can make anything. Let’s move on to the next step.
More content at plainenglish.io