Physical Computing with JavaScript (8/8) — Connecting to the Internet

In this tutorial, let’s connect to the Internet by controlling the Wi-Fi module through UART (Universal Asynchronous Receiver/Transmitter).
Components
- Raspberry Pi Pico — 1 qty.
- Breadboard — 1 qty.
- DHT11 sensor — 1 qty.
- Wi-Fi network module (ESP8266, ESP-01 module) — 1 qty.
- Jumper wires (M-M and M-F types)

The ESP8266 is a microcontroller with Wi-Fi network capability. It is very popular because of its low price. It is sold in various module types for convenient use. Here, the ESP-01 module, which is small in size and low-price, is used. In the module, firmware that can use AT commands is usually uploaded.

Circuit

Connect ESP-01 to UART0 port and also connect CH_PD pin to 3V3. And the OUT pin of the DHT11 sensor is also connected to GPIO15. Unfortunately, the ESP-01 module is not designed to be plugged into a breadboard. So, it should be connected through M-F (Male-to-Female) type jumper wires.
UART(Universal Asynchronous Receiver/Transmitter)
Unlike the I2C and SPI described in the previous tutorial, UART (Universal Asynchronous Receiver/Transmitter) does not use a clock pin. Therefore, it is necessary to match the communication speed between devices. This is called baudrate, and 9600bps and 115200bps are the most used. In Pico, two ports are provided: UART0 and UART1. And unlike I2C and SPI, UART is not a bus. Therefore, only one device can be connected to each port.
In Kaluma, it can be used through the uart module as shown below. Data transmission is possible through the write() function. But there is no function for receiving data. Since the external UART device does not know when to transmit data, the received data is transmitted through the data event. Since the received data is a Uint8Array type, if you want to print it on the terminal, you need to convert it to a String type.
const {UART} = require('uart');
let uart0 = new UART(0);
uart0.write('Hello\n');
// ...
uart0.on('data', (data) => {
  var s = String.fromCharCode.apply(null, data);
  print(s);
});
// ...
uart0.close();
AT Command
AT Command (a.k.a. Hayes command set) is a set of commands developed for early modems. Commands usually start with the text “AT” so they are called AT commands, which is an abbreviation for “attention”. Although it was developed very long time ago, it is widely used as a command to control various devices until recently. The ESP8266 also supports this AT command to control the wireless network.
First, let’s control the ESP8266 connected to UART0 with AT commands as shown in the above circuit diagram. In order to send AT commands directly from the terminal to the UART and print the received data on the terminal, enter (copy and paste) the code below line by line in the terminal. The code below simply creates an object for UART port 0 and prints it to the terminal when data is received. Since the received data is a Uint8Array type, it is converted into a string for easy reading and output.
> const {UART} = require('uart');
> let uart0 = new UART(0, {baudrate: 115200});
> uart0.on('data', d=>{print(String.fromCharCode.apply(null, d))});
First, let’s see if the ESP8266 is properly connected and responds normally to AT commands. Let’s send AT\r\n string through UART as shown below. Then OK will be received as a result immediately after the echo of the transmitted command is received. Note that \r\n must always be appended to the end of AT commands.
> uart0.write('AT\r\n');
undefined
> ATOK
Next, let’s send a command to reset the ESP8266. Some weird strings appear in abundance. If you see OK at the beginning and ready at the end, initialization is successful.
> uart0.write('AT+RST\r\n');
undefined
> AT+RSTOK
...
load 0x40100000, len 1856, room 16
tail 0
chksum 0x63
load 0x3ffe8000, len 776, room 8
...
Ai-Thinker Technology Co. Ltd.ready
We will use mostly in station mode, so we have to change ESP8266 module into the station mode as below.
> uart0.write('AT+CWMODE=1\r\n');
undefined
> AT+CWMODE=1OK
Finally, let’s send a command to scan nearby APs to see if the Wi-Fi function works well. Let’s check if the wireless networks around me are well searched.
> uart0.write('AT+CWLAP\r\n');
undefined
> AT+CWLAP
+CWLAP:(3,"xxxxxxxxxxx",-78,"xx:xx:xx:xx:xx:xx",1,10,0)
+CWLAP:(3,"xxxxxx",-53,"xx:xx:xx:xx:xx:xx",11,-2,0)
...OK
Can you see the networks around me well (for security reasons, SSID and BSSID are replaced by x)? This is enough to understand how the AT command of the ESP8266 is executed. For more detail about AT commands, please refer to the related documentation. For reference, the link below is a document that succinctly summarizes the AT commands of ESP8266.
Launch an external web server
In order to transmit the temperature and humidity data measured by Pico to the Internet, a server that can receive it is required. Now let’s create a simple web server to receive data using express.js with Node.js. Create a folder as shown below, initialize the Node.js project, and then add express and ip modules.
$ mkdir thermo-server
$ cd thermo-server
$ npm init -y
$ npm install express, ip --save
Write the server.js program as below. If you connect to this server with a browser, the current temperature and humidity are displayed. Also, a REST API of HTTP GET method is provided so that the temperature and humidity information measured by the DHT11 sensor in Pico can be transmitted to the server as /update?t=27.5&h=45.
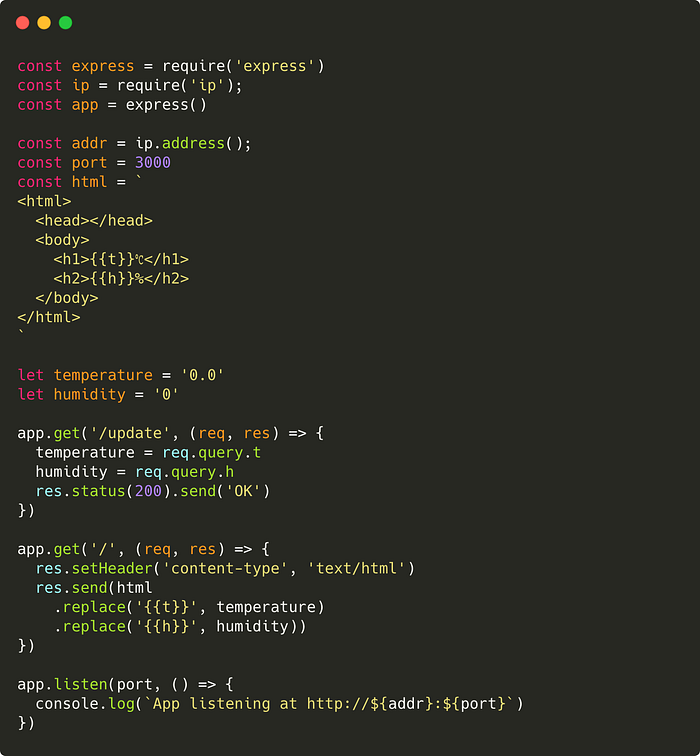
After writing the code, let’s start the web server. It is executed with the IP address and port number of the web server displayed as shown below.
$ node server
App listening at http://xxx.xxx.x.xx:3000
Send data to web server
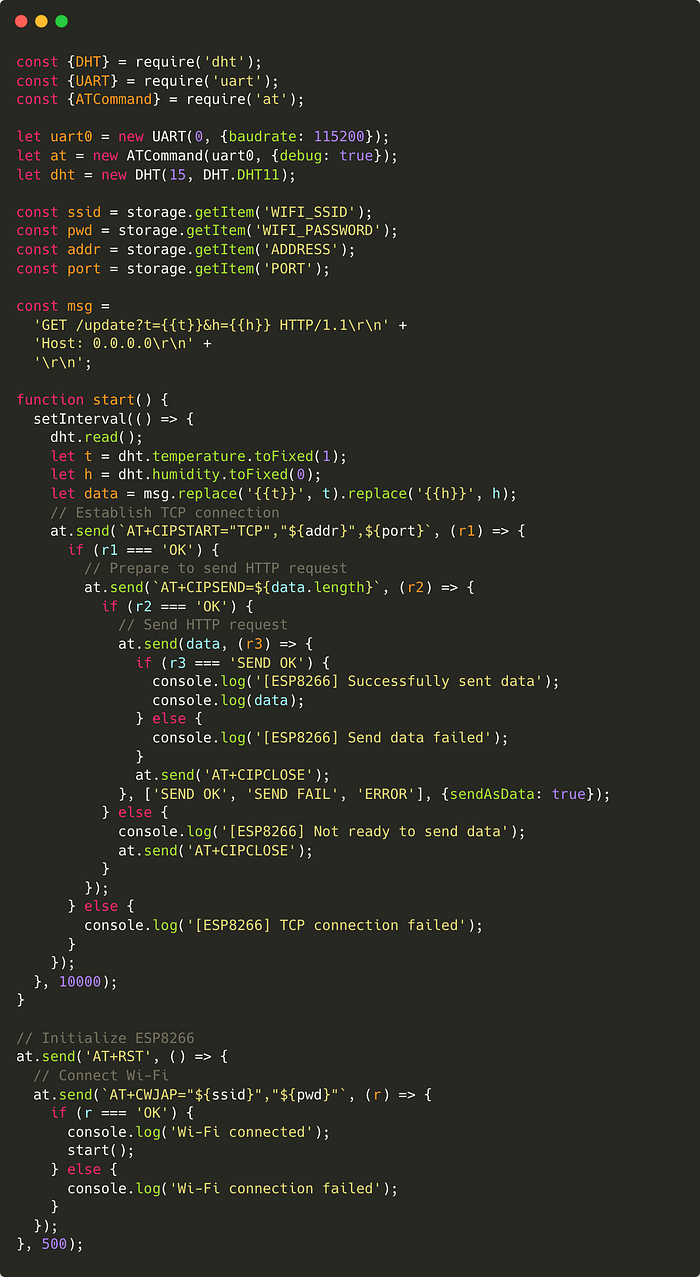
Now, all you need to do is to send the temperature and humidity data from Pico to the web server. However, it is difficult to disclose information such as Wi-Fi password or server address to the outside. Since all projects created in Kaluma are currently in public mode, there is a risk of such information being exposed to the outside. So, let’s use the Storage API to store the information in Pico’s flash memory and not expose it in code. First of all, we will save the Wi-Fi SSID, Password, Address, and Port to the Pico’s flash memory. Enter the following in the terminal.
> storage.setItem('WIFI_SSID', 'xxxxxxx');
> storage.setItem('WIFI_PASSWORD', 'xxxxxxxx');
> storage.setItem('ADDRESS', 'xxx.xxx.x.xx');
> storage.setItem('PORT', '3000');
These saved items can be read back as follows. By allowing the code to read these stored items, you can prevent the information from being exposed.
> storage.getItem('WIFI_SSID');
> storage.getItem('WIFI_PASSWORD');
> storage.getItem('ADDRESS');
> storage.getItem('PORT');
Now, let’s write the code below and upload it. We use the at module provided by Kaluma to handle AT commands more conveniently. Using this, you can transmit AT commands very conveniently and also pass the transmission result to a callback function easily. When creating the ATCommand class, passes the UART object connected to ESP-01 module, and if you want to see the data coming and going from here, you can set the debug option to true. In the development stage, it will be very convenient to view the debug information. Refer to the reference of the at module to see the full function.
When the code is executed, the ESP8266 is initialized with AT+RST command, and then tries to connect to Wi-Fi with AT+CWJAP command. When the connection is successful, the start() function is executed to measure the temperature and humidity from the DHT11 sensor every 10 seconds, and an HTTP GET request is generated and transmitted to the server.
After the Pico transmits the temperature and humidity data to the server, now let’s check the temperature and humidity by accessing the server with a browser on a smartphone or PC. If the server has a static IP that can be accessed from the outside, you can check the temperature and humidity anywhere.

Using a third-party module
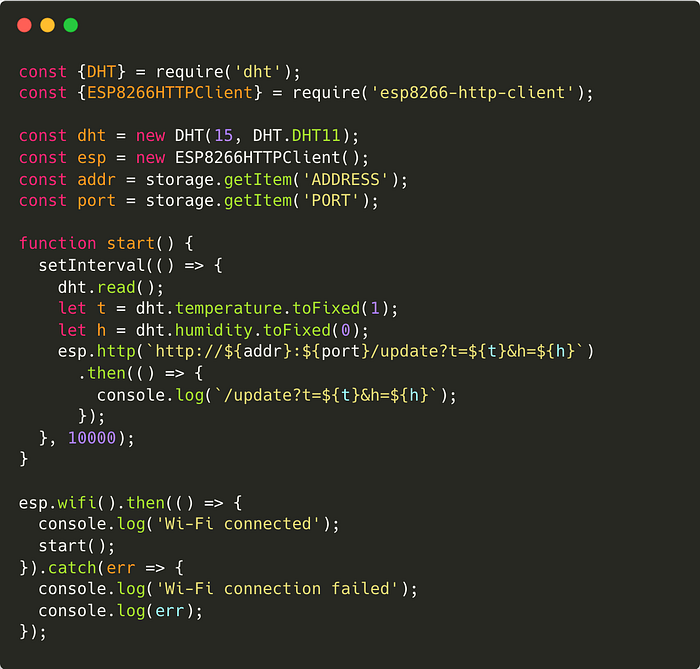
It is very cumbersome to directly compose an HTTP request message and send it as an AT command. Let’s use a simple module to make this process easier.
$ npm i https://github.com/niklauslee/esp8266-http-clientWhen you need to communicate with an HTTP server, this module eliminates the need to send AT commands directly, and also eliminates the need to manually create HTTP request messages, and also automatically parses the received response messages. Using this module, you can write the code very concisely as follows.
In this last tutorial, we tried to transmit the temperature and humidity over the Internet using the AT command. So far, I have tried to convey the basics of physical computing using JavaScript as easily as possible through this tutorial. Now, how about making your own interesting projects?
End.
More content at plainenglish.io